So anyway...where was I?
Oh yeah...camping.
In 1975, a year after I got out of the US Navy, I began camping, and before too long I was an avid camper. I went out to the woods of Michigan at least three times every season, and made many camping trips in Pennsylvania as well as Tennessee. I loved it. I once went camping all around Lake Superior...the "circle route"; up through Michigan to Ontario, Minnesota, Wisconsin, and back to Michigan.
I especially liked camping with my good friends Pete and Kim; together we explored many of the beautiful Great Lakes parks and woodlands of Michigan. My dear friend Linda Sweigart and her niece Stacy, and I made a memorable trip to Manitou Island in northern Lake Michigan. I spent a lot of time in a tent in the wilds of the Upper Peninsula of Michigan, Camping in Michigan is incredible, the influence of the towering native white pine and the Great Lakes are everywhere. People who aren't from Michigan would weep with envy if they could see Ludington State Park on Lake Michigan, De Tour State Park on Lake Huron, Hartwick Pines State Park - spared the axe in the heyday of Michigan's dominion of the timber industry, P.J. Hoffmaster, Mackinac Island, Sleeping Bear Dunes...the list goes on; 74 state parks and 12 state forests.
This is the wonderland that I had at my fingertips.
Changing circumstances being what they were, twenty-five years, or so, ago, I fell out of camping, It wasn't convenient for a variety of reasons. I did, however have a used 22-footer RV for about four years, and that thing was a joy...but maintenance was becoming an issue so I sold it while I could still get a good price. But, generally, I was out of the woods.
As time marched on, I found myself in a position to take up my old hobby again. It was almost exactly six years ago that I took another stab at it.
I started afresh, with new gear, including a luxurious Coleman eight-person tent! What comfort, what headroom, what a delight to have a screened-in vestibule as part of the tent...
what a pain to erect. Literally, what a pain. I think that I pulled every muscle of every muscle I have putting that thing up. After practicing in the backyard, I packed up everything and drove to nearby Greenbrier State Park here in Maryland. The hassle of erecting the tent, the discomfort of sleeping on the ground, and a general aimlessness turned it into a pretty hollow experience...so, again, I moved away from camping.
But still...
I love Greenbrier. When I still lived in Michigan I would drive twelve hours to get to Greenbrier, smack in Civil War country, which was, and still is, one of my enduring interests. But after a twelve-hour drive, by the time I got to the park, I was exhausted...and I still had to get the tent up.
Well Greenbrier is still my favorite Maryland Park, and now I have to drive...
9 minutes to get there.
You can't beat that.
What has gotten me back in to the woods is the concept of "car camping" and a screened-in hatch awning for my Subaru Forrester.
I've been doing post-season and pre-season camping for the past since autumn of 2020 and I'll be out again this coming spring (by which time I hope to have a small "square-drop" trailer). Each jaunt is a two-night adventure. And I have been enjoying it immensely. The cooking, the solitude, and evening campfire, listening to my solar-powered radio, and sleeping in the semi-bear proof safety of my car, snug as a bug in my own personal Gemini capsule. I'm so happy to be back in the woods, and how it conjures up good memories of Pete, Kim, Linda, Stacey and others.
I promised some like-minded friends that I would post some pictures of how to set it up. What follows is a step-by-step primer on how to erect the Napier hatch awning...and it's also a great way to kick off this blog.
So...on we go!
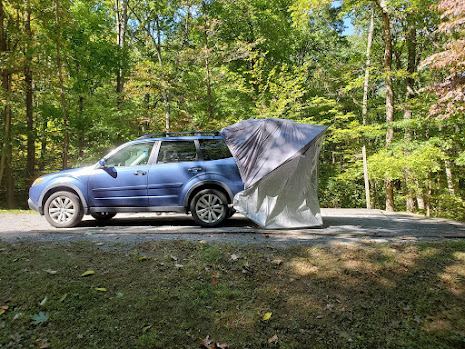
Trusty Subaru Forester with hatch up and ready for the deployment of the Napier awning.
The first thing you do is drape the awning over the hatch. Helpful printed on the awning is the legend "THIS SIDE TOWARD CAR"
When sliding the sleeve-like awning over the lid of the hatch there are two reenforced corners that the corners of the hatch lid fit into.
The lower corners are secured by strap-and-hook to the wheel-wells, hubs, or whatever is handy down there. All straps are adjustable for a snug fit.
Other elasticized straps snug the sleeve around the bumper.
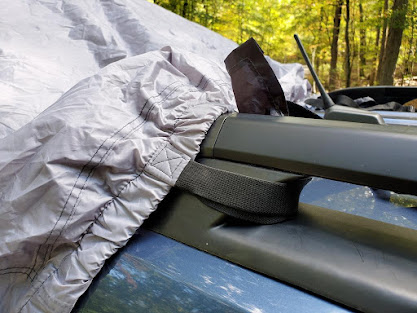
The top of the sleeve is secured to the luggage rack. If the car is sans rack, Napier includes two long straps that hook to the front bumper, thus achieving the same effect.
The shock-corded hoop is about fifteen feet long when assembled. This is the most difficult part of assembly, but after you've done it once, it becomes "old hat."
The first step is to slide the hoop to its mid-point through a tunnel sewn into the inside edge of the awning.
Next, and I cannot overstate the importance of sequence for this step, you insert the end of the pole into a long pocket on the driver's side of the lower awning corner.
Then you tuck the passenger side of the hoop into a deep sleeve on that side. Velcro makes it so you can open it, which is essential because there is very little give in the hoop.
There are velcro loops all along the way to keep the hoop in place.
The final step is to secure the bottom of the unit, with a strap and hook, to the closure-hook of the hatch lid.
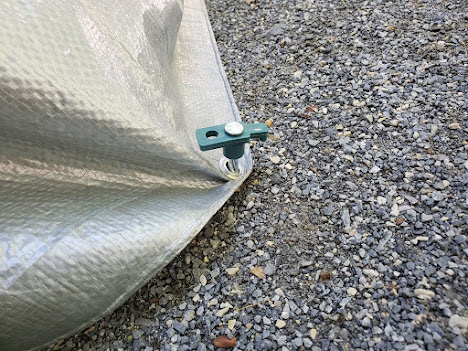
If you want, you can stake the awning. I did this once on a breezy day, though the awning is so secure and rigid that it wasn't really necessary.
So here is is, fully deployed.
Here is what a car awning gives you:
- the ability to sleep with the hatch open, a zip-up screen door lets air in and bugs out, and an outer zip-up door affords privacy.
- about three additional inches of foot room.
What a car awning doesn't give you:
- no additional headroom...at all.
Trying to dress and undress in the back of the car makes me positively claustrophobic. And trying to use the trusty pee-jug?...well, we won't go in to that. I wanted to find a way to solve those issues.
In just three hours I made a vestibule that is completely compatible with the awning. It provides all kinds of headroom, floorspace, privacy, and fresh air. It is rainproof and, if need be, you could put a lawn chair in there to wait out inclement weather. I couldn't be happier with the results, and it cost less than twenty dollars.
I cut two of these out of cheap 8x10 plastic tarps.
I spaced grommets along the top edge of each piece...each "half."
Both halves are affixed to the hoop with shower curtain hooks. The halves overlap in the center to provide a door.
Existing grommets along the bottom edge (and I added more) allow it to be staked down.
I used gorilla tape to reenforce the grommet points and to affix the squares of nylon screen to square holes in each half. These windows provide light, air, and they are high enough to permit privacy (if you know what I mean).
I put a carpet runner inside it to make it more comfortable on my stocking-feet when I remove my boots.
Like I say...three hours from conception to deployment.
It works wonderfully and provides me with everything I needed to make living in the cramped confines of a car much more enjoyable.
It's pretty ironic that now that I'm no longer a Park Ranger, I'm spending a lot more time in nature.
See you out there.
Mannie
(the Old Ranger)


